Passwordless Authentication
We have covered three types of authentication so far: HTTP basic authentication, session-cookie authentication, and token-based authentication. They all require a password. However, there are other ways to prove your identity without a password.
When it comes to authentication, there are three factors to consider:
- Knowledge factors: something you know, such as a password
- Ownership factors: something you own, such as a device or phone number
- Inherence factors: something unique to you, such as your biometric features
Passwords fall under “something you know”. One-Time Passwords (OTP) prove that the user owns a cell phone or a device, while biometric authentication proves "something unique to you".
One-Time Passwords (OTP) are widely used as a more secure method of authentication. Unlike static passwords, which can be reused, OTPs are valid for a limited time, typically a few minutes. This means that even if someone intercepts an OTP, they can’t use it to log in later. Additionally, OTPs require “something you own” as well as “something you know” to log in. This can be a cell phone number or email address that the user has access to, making it harder for hackers to steal.
However, it's important to note that using SMS as the delivery method for OTPs can be less secure than other methods. This is because SMS messages can be intercepted or redirected by hackers, particularly if the user's phone number has been compromised. In some cases, attackers have been able to hijack phone numbers by convincing the mobile carrier to transfer the number to a new SIM card. Once the attacker has control of the number, they can intercept any OTPs sent via SMS. For this reason, it's recommended to use alternative delivery methods, such as email or mobile apps, whenever possible.
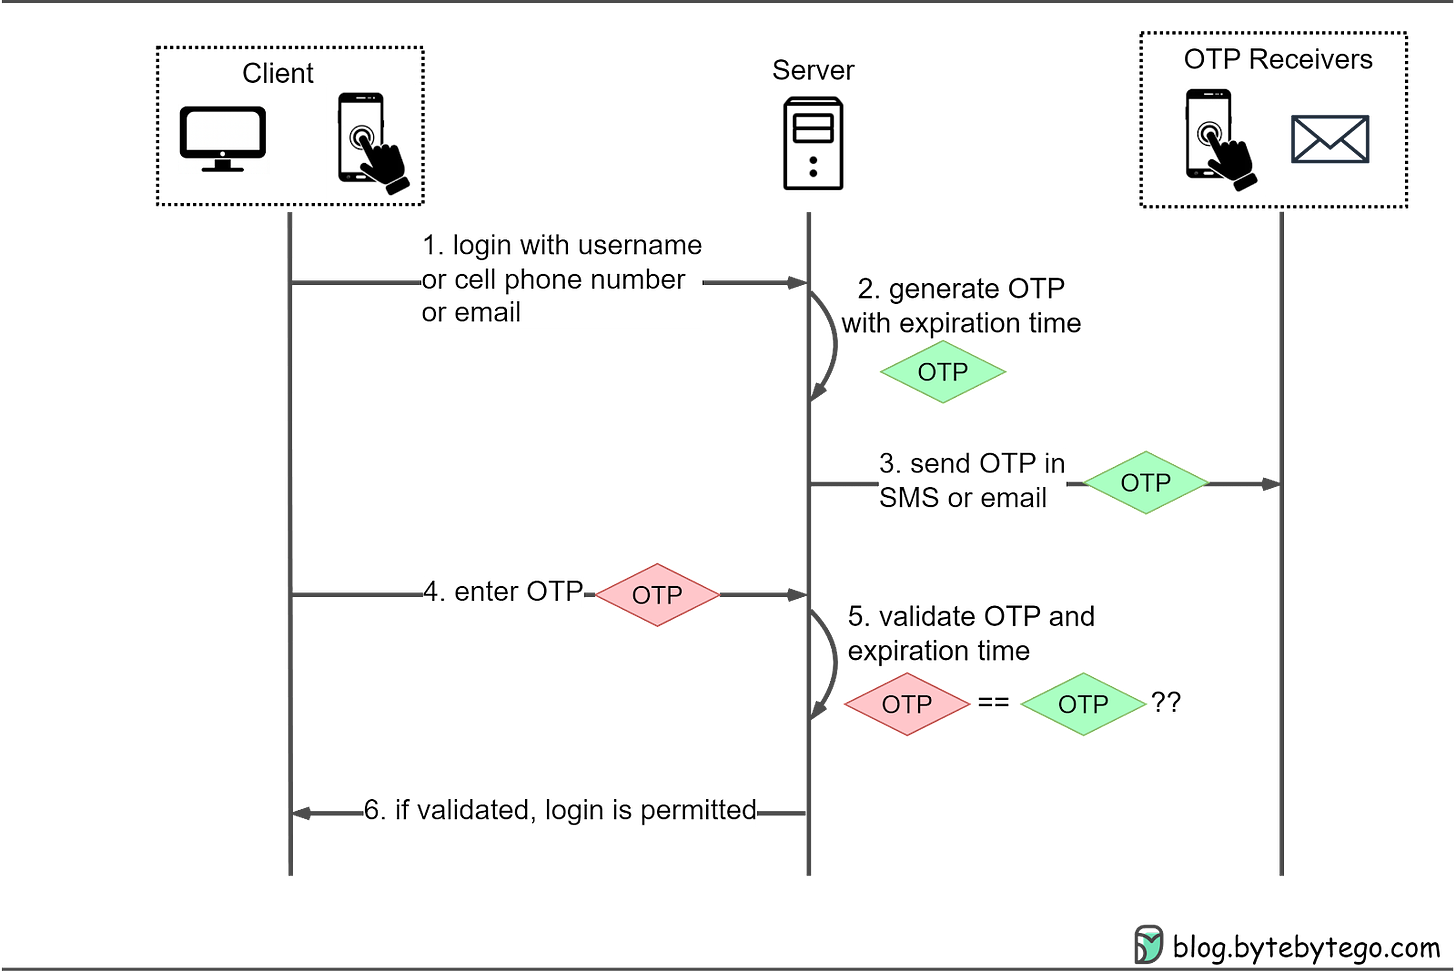
Here’s how OTPs work in more detail:
Step 1: The user wants to log in to a website and is asked to enter a username, cell phone number, or email.
Step 2: The server generates an OTP with an expiration time.
Step 3: The server sends the OTP to the user’s device via SMS or email.
Step 4: The user enters the OTP received in the login box.
Step 5-6: The server compares the generated OTP with the one the user entered. If they match, login is granted.
Alternatively, a hardware or software key can be used to generate OTPs for multi-factor authentication (MFA). For example, Google 2FA uses a software key that generates a new OTP every 30 seconds. When logging in, users enter their password and the current OTP displayed on their device. This adds an extra layer of security as hackers would need access to the user’s device to steal the OTP. More on MFA later.
Single Sign-On (SSO) is a user authentication method that allows us to access multiple systems or applications with a single set of credentials. SSO streamlines the login process, providing a seamless user experience across various platforms.
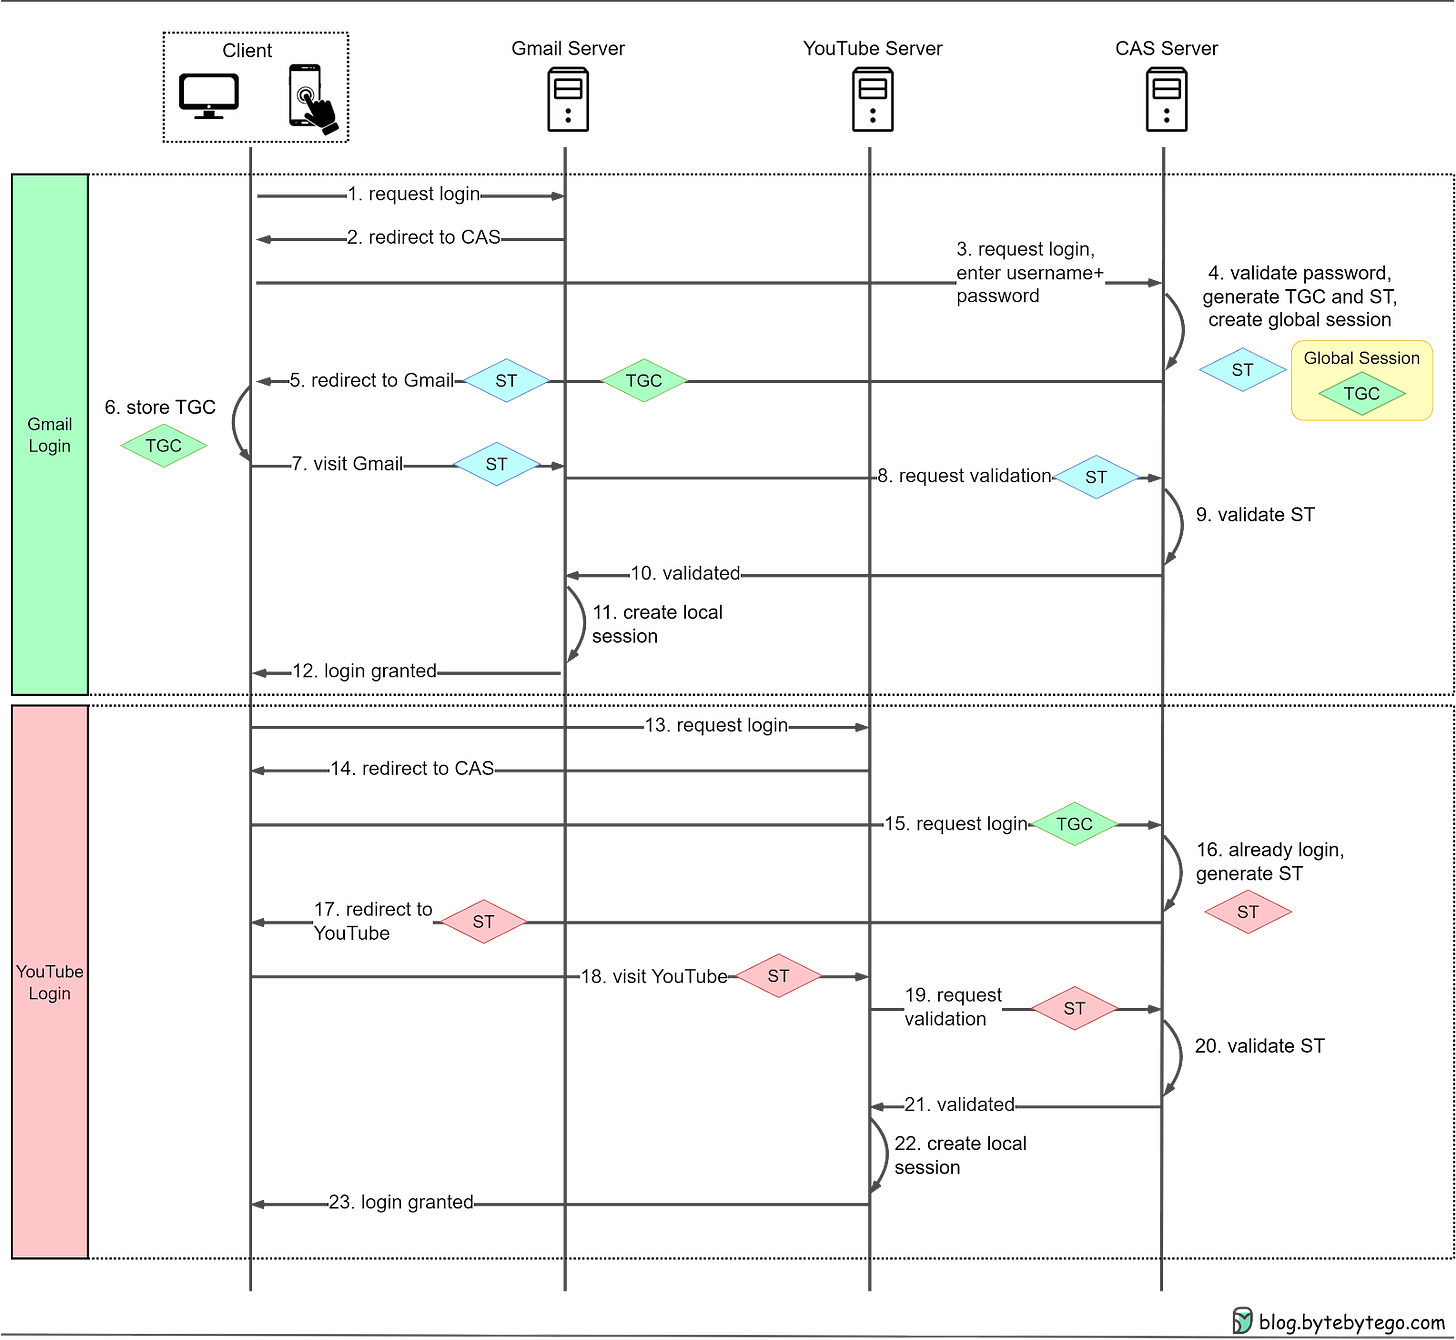
The SSO process mainly relies on a Central Authentication Service (CAS) server. Here's a step-by-step breakdown of the SSO process:
- When we attempt to log in to an application, such as Gmail, we're redirected to the CAS server.
- The CAS server verifies our login credentials and creates a Ticket Granting Ticket (TGT). This TGT is then stored in a Ticket Granting Cookie (TGC) on our browser, representing our global session.
- CAS generates a Service Ticket (ST) for our visit to Gmail and redirects us back to Gmail with the ST.
- Gmail uses the ST to validate our login with the CAS server. After validation, we can access Gmail.
When we want to access another application, like YouTube, the process is simplified:
- Since we already have a TGC from our Gmail login, CAS recognizes our authenticated status.
- CAS generates a new ST for YouTube access, and we can use YouTube without inputting our credentials again.
This process reduces the need to remember and enter multiple sets of credentials for different applications.
There are different protocols that facilitate SSO:
- SAML (Security Assertion Markup Language) is widely used in enterprise applications. SAML communicates authentication and authorization data in an XML format.
- OIDC (OpenID Connect) is popular in consumer applications. OIDC handles authentication through JSON Web Tokens (JWT) and builds on the OAuth 2.0 framework. More on this in the next section.
For new applications, OIDC is the preferred choice. It supports various client types, including web-based, mobile, and JavaScript clients.
SSO offers a streamlined and secure authentication method, providing a seamless user experience by requiring only one set of credentials for multiple applications. This approach enhances security through the use of strong, unique passwords and reduced phishing risks. It also minimizes administrative burdens for IT departments.
While OAuth 2.0 is primarily an authorization framework, it can be used in conjunction with OpenID Connect (OIDC) for authentication purposes. OIDC is an authentication layer built on top of OAuth 2.0, enabling the verification of a user's identity and granting controlled access to protected resources.
When using "Sign in with Google" or similar features, OAuth 2.0 and OIDC work together to streamline the authentication process. OIDC provides user identity data in the form of a standardized JSON Web Token (JWT). This token contains information about the authenticated user, allowing the third-party application to create a user profile without requiring a separate registration process.
In this setup, OAuth 2.0 provides "secure delegated access" by issuing short-lived tokens instead of passwords, allowing third-party services to access protected resources with the resource owner's permission. This method enhances security, as the third-party service does not handle or store the user's password directly.
The diagram below shows how the protocol works in the “Sign in with Google” scenario.
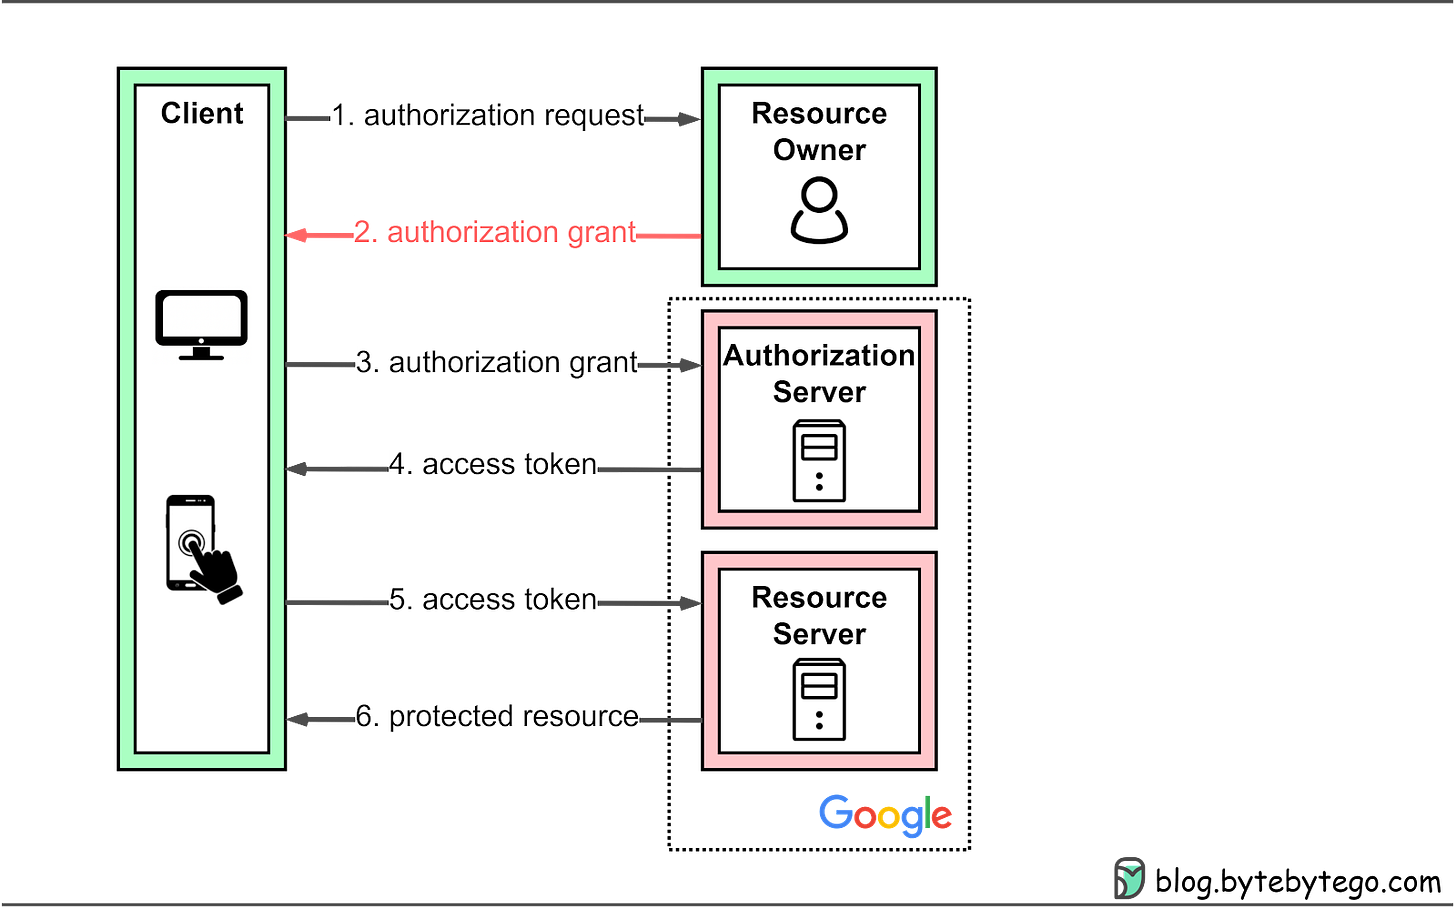
In the “Sign in with Google” example, OAuth 2.0 defines four roles:
- Resource owner: The end user, who controls access to their personal data.
- Resource server: The Google server hosting user profiles as protected resources. It uses access tokens to respond to protected resource requests, ensuring that only authorized services can access the data.
- Client: The device (PC or smartphone) making requests on behalf of the resource owner. This device represents the third-party application seeking access to the user's data.
- Authorization server: The Google authorization server that issues tokens to clients, managing the secure exchange of tokens between the resource server and the client.
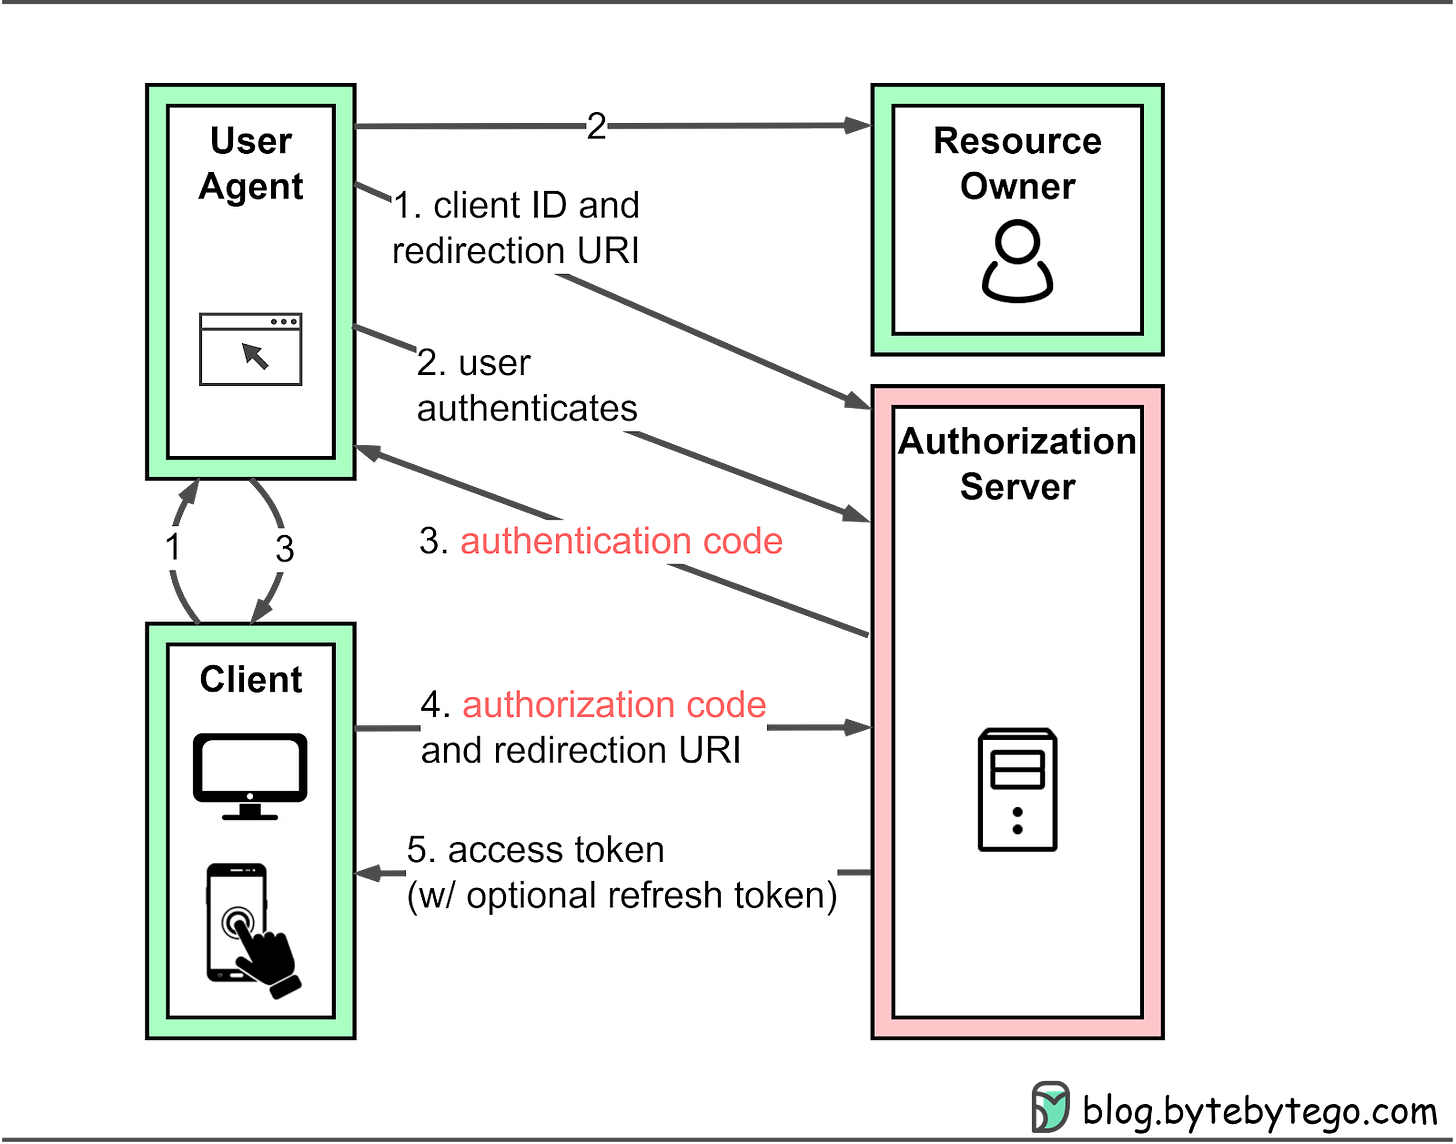
OAuth 2.0 offers four types of authorization grants to accommodate different situations:
- Authorization code grant: The most complete and versatile mode, suitable for most application types. More details below.
- Implicit grant: Designed for applications with only a frontend, such as single-page applications or mobile apps. This is no longer recommended. More details below.
- Resource owner password credentials grant: Used when users trust a third-party application with their credentials, such as a trusted mobile app.
- Client credentials grant: Suitable for cases without a frontend, like command-line tools or server-to-server communication, where resource owner interaction is not needed.
The standard provides multiple modes to cater to different application scenarios and requirements, ensuring flexibility and adaptability for diverse situations.
The authorization code grant is one example worth examining. The specifications for the other three grant types are available in RFC-6749.